In this
short tut I am going to show you how to create simple Spiral and
Butterfly Composition using only basic Illustrator instruments plus
default symbols and brush.
The
Pattern and Gradient I have applied to the Background are exclusive
for all versions of the program, as for both symbols used, you can
replace them with another shapes which you can download from the web.
You can also use another brush to stroke the spiral and create
awesome effect.
This is the final result:
STEP 1
Create a
new Illustrator .ai document of 1000 px both Width and Height (from
Units drrop down menu choose Pixels). Name the file Spiral and
Butterfly Composition and select RGB for Color Mode. I have set the
Resolution to Medium (150ppi).
STEP 2
Take
Rectangle tool and draw Rectangle which covers your artboard. Set the
Fill color to R=166, G=185, B=175 to colorize the artboard with it
(the Rectangle should be selected with Selection tool and Stroke
color should be disabled).
Rename
your Layer 1 to Background.
STEP 3
STEP 4
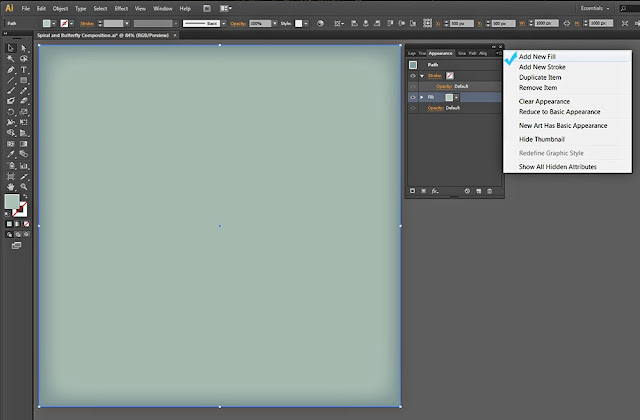
Keep the
Background rectangle selected and open Appearance palette (Window,
Appearance). Click on the tiny arrow at the upper right side of the
palette and select Add New Fill from the fly out menu.
STEP 5
This is
how your Background should look so far. In Appearance palette you can
see both fills.
STEP 6
Create New
Layer in Layers palette. Actually you can proceed to draw shapes
without creating new layers as everything is visible in Appearance
palette, but frankly speaking I don't like that mess.
Name the
new layer Dot Pattern after the vector shape we are going to put on
our artboard. You can lock your Background layer then select the new
one and go to Window, Symbols. Click on the tiny arrow at the bottom
left of Symbols palette and select Dot Pattern Vector Pack from the
fly out menu.
Select Dot
Pattern Vector Pack 12 symbol and drag it from the palette onto your
artboard. Use Selection tool to resize it and place as you see on the
following screenshot.
Keep Dot
Pattern Vector Pack 12 symbol selected and go to Transparency palette
(Window, Transparency). Set the Blend Mode of the symbol to Soft
Light and lower its Opacity to 60%.
STEP 7
Now you
can lock both Background and Dot Pattern layers and Create New Layer
on top of Layers palette. Name it Spiral.
Now
disable the Fill Color and set the Stroke Color to dark red (R=190,
G=30, B=45). Select Spiral tool and click once anywhere on your
artboard to activate its dialog box. Set the Radius to 400px, Decay
to 80% and Segments to 10.
This is
how your Spiral will look. You can set Stroke Weight to 5pt.
STEP 8
Stroke the
Spiral with 6D Scatter Brush 1.
STEP 9
While the
stroked Spiral is selected, go to Object, Expand Appearance. I used
Selection tool to modify the Spiral and put it on the artboard like
this:
STEP 10
Now go to
Effect, Stylize and choose Drop Shadow. Leave Mode to Multiply, them
set Opacity to 80%, X and Y Offset to 0px both and Blur to 25px.
STEP 11
STEP 12
Create New
Layer on top of Layers palette again and name it Copper Radial after
the Gradient we are going to use. Open Swatches Library and select
Gradients, Metals, then click on the Copper Radial Swatch. Draw a
Rectangle covering your artboard. Disable Stroke Color. You should
get this outcome.
STEP 13
In
Transparency palette change the Blend Mode of Copper Radial layer to
Soft Light.
STEP 14
On the
screenshot below is shown the ready composition and the result in
Layers palette. You should have these five layers in it (from bottom
to top): Background, Dot Pattern, Spiral, Butterfly and Copper
Radial.
STEP 15
Go to
File, Export to save your work in a chosen format. I saved mine in
.jpg and below is shown my final result.
Hope you
like this short tut and find it funny and useful. Thank you very much
for reading and if you have questions, just leave a comment below. :)


No comments:
Post a Comment