In this short tut I
will show you how to add a few Textures to an image in order to achieve unique
result.
All five images used to
create the outcome are my own photos and unrestricted stock. You can use them
for your own works without informing me.
You can achieve the
effect in any Photoshop version.
This is what you are
going to create:
STEP 1
Start your work with
downloading this Flower image- click on it to open it in high resolution, then
right click and select Save As to place it in your folder.
Add Water Textures
to Achieve Dreamy Effect
STEP 2
Open in Adobe
Photoshop the photo you downloaded in the first step and rename its layer to
Flower.
Create a New Layer on
top of Layers panel and call it Colorful Water. Press Ctrl+G to put it in a
group. Rename your Group 1 to Textures.
STEP 3
Now download this
Colorful Water Texture the same way you downloaded the photo in Step 1.
STEP 4
Open the Colorful
Water Texture in Photoshop then press Ctrl+A and Ctrl+C to Select and Copy it.
Go back to your
original .psd file (the one with the flower), select Colorful Water layer and
press Ctrl+V to Paste there the Texture. Apply Edit, Free Transform to resize
the Texture so that it covers your canvas. Press Enter to apply the
Transformation.
STEP 5
Change Blend Mode of
Colorful Water layer to Linear Light.
STEP 6
While Colorful Water
layer is selected, click on Add Layer Mask icon at the bottom of Layers pane.
STEP 7
This is how your layer
will look in Layers pane after the Layer Mask has been added:
STEP 8
Check if your
Foreground/Background Colors are set to Black/White then take Brush Tool and
Choose Soft Round Brush- the first one in the Brush Preset Picker. Change its
Size to 500px, then start brushing in the middle of the canvas (your Layer Mask
thumbnail should be highlighted). Continue brushing until you remove the
portions of the Texture that cover the flower. You can leave parts of the
Texture on the petal ends. This is the outcome you should get:
STEP 9
It is time to download
the following Golden Water Texture:
STEP 10
Create a New Layer on
top of Textures group and name it Golden Water. Copy the Texture you downloaded
in the previous step and Paste it in this new layer (see Step 4) then resize it
using Free Transform. Change the Blend Mode of Golden Water layer to Overlay.
STEP 11
Apply Layer Mask on
the Golden Water Texture and using the same Soft Round Brush of 500px Size,
brush over the Flower. You can leave portions of the Texture on its petal ends.
STEP 12
Now duplicate Golden
Water layer (Ctrl+J) then change the Blend Mode of the duplicate to Screen and
reduce its Opacity to 65%.
STEP 13
In this step you
should download this Platinum Water Texture:
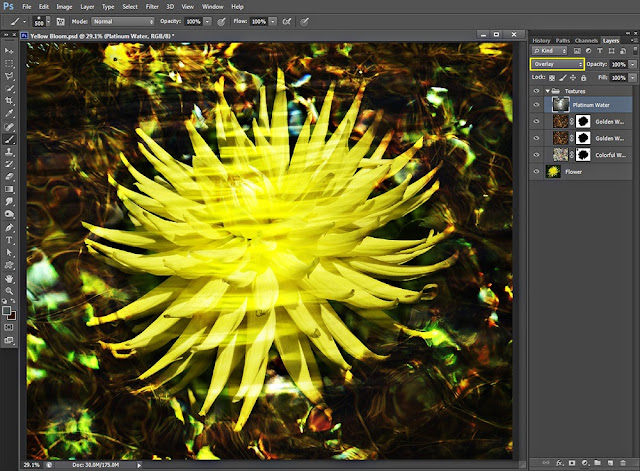
STEP 14
Create a New Layer on
top of Textures group and name it Platinum Water then Paste there the Texture
you downloaded in the previous step. Use Edit, Free Transform to resize it so
that it covers your canvas, then change the Blend Mode of its layer to Overlay.
STEP 15
Apply Layer Mask on
Platinum Water layer and brush inside the Mask with Soft Round Brush of 500px
Size to remove most of the portions covering the Flower. Leave only traces on
the ends of the petals.
Apply Stone Texture
and Soft Brush to add Relief and Vibrant Colors
STEP 16
The last photo you
have to downolad is this Stone Texture:
STEP 17
Create a New Layer on
top of Textures group and name it Stone Texture. Paste there the previously
downloaded image and change the Blend Mode of the layer to Pin Light.
STEP 18
Apply Layer Mask on
the Stone Texture layer and remove with the Black Soft Round Brush the Texture
in the middle of the flower. Leave the petals ends covered with the Texture as
you see on the screenshot below:
STEP 19
Create a New Layer on
top of Layers pane and call it Soft Round Brush. Press Ctrl+G to place the layer
in a group. Rename the group to Front Effects.
Select Soft Round
Brush and set its Size to 250px. Start making dabs on the flower with colors of
your choice. As you can see, I have used the following four colors: #07ccf2,
#68fb5d, #f28216 and #f00e36.
STEP 20
Change Blend Mode of
Soft Round Brush layer to Color and reduce its Opacity to 60%.
STEP 21
While Soft Round Brush
layer is highlighted, go to Layer, New Adjustment Layer and select Color
Balance. Change its Properties settings as follows:
Midtones:
Cyan-Red: -52
Magenta-Green: -31
Yellow-Blue: -51
Shadows:
Cyan-Red: +29
Magenta-Green: +13
Yellow-Blue: +37
Highlights:
Cyan-Red: -19
Magenta-Green: -11
Yellow-Blue: +24.
STEP 22
This is how your work
will look so far after applying Color Balance Adjustment layer:
STEP 23
Navigate again to the
Menu bar and choose Layer, New Adjustment Layer, but this time select Photo
Filter. When Properties dialog box pops up on your screen, select Sepia from
Filter drop down menu and increase its Density to 98%.
STEP 24
Change the Blend Mode
of Photo Filter Adjustment layer to Multiply and reduce its Opacity to 40%.
STEP 25
This outcome you
should get after following all my steps.
Hope you like this
easy to perform tutorial and find it useful. Thanks a lot for reading. If you
have questions, please leave a comment below. :)


No comments:
Post a Comment